Initial situation
A healthy 72-year-old male, a non-smoker on no medication, came to our clinic as, a few months before, he began to notice gingival inflammation and bleeding in the area of his two central incisors. He visited a previous dentist who, following the clinical and radiographic assessments, concluded that the teeth presented vertical fractures and, therefore, needed to be extracted. The patient stated that he would like to restore them in the shortest possible time and maintain pleasing esthetics until the end of the treatment.
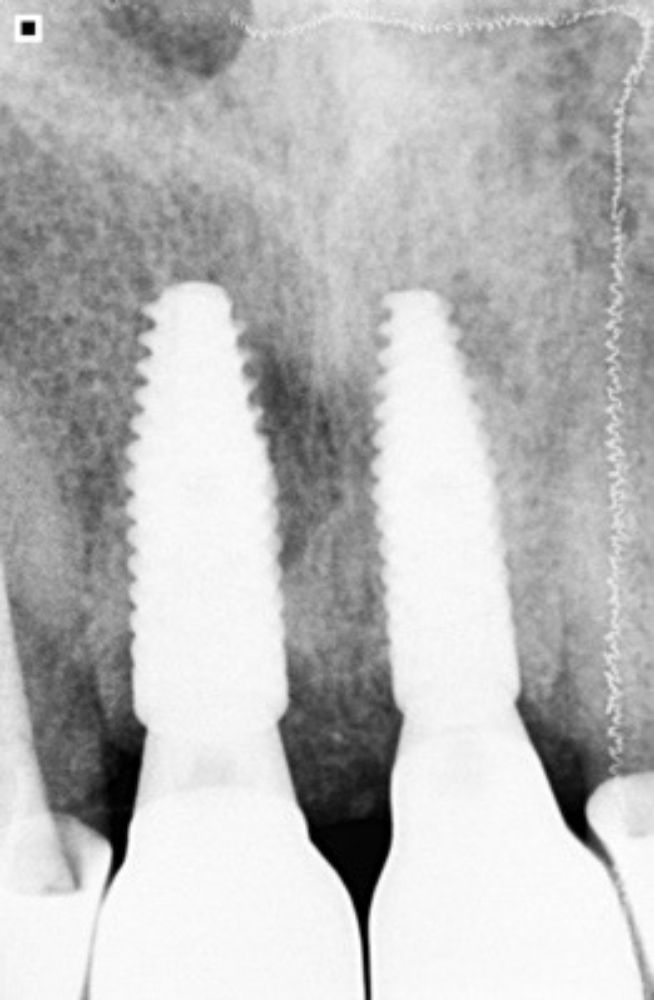
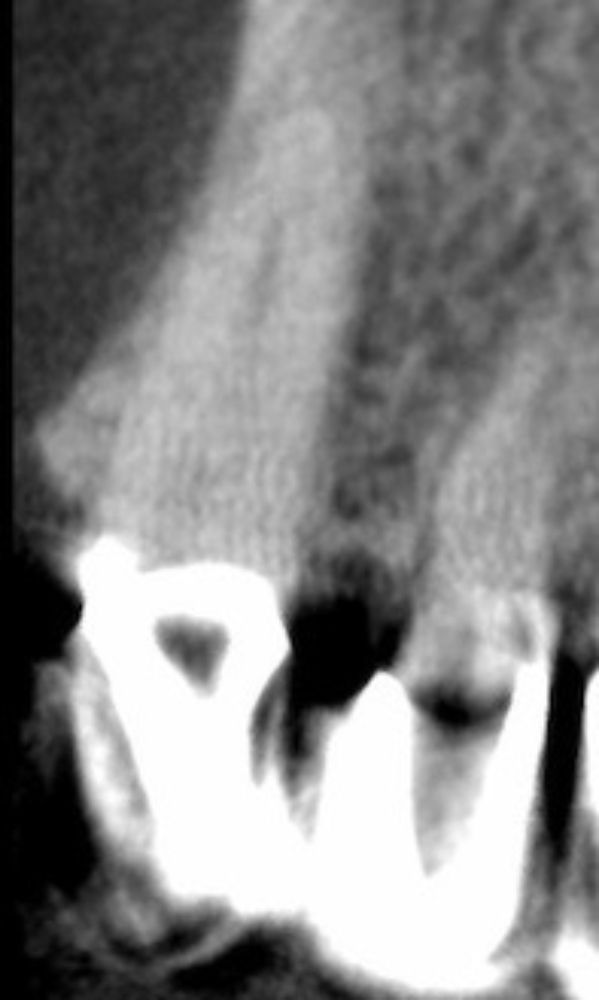
The extraoral examination revealed a low smile line (Fig. 1) The intraoral and CBCT examination showed hopeless teeth #11 and #21 with vertical root fractures. Moreover, tooth #21 also presented an active fistula and loss of the buccal bone plate (Figs. 2-4).
The SAC classification was used, since it provides an objective, evidence-based framework for assessing the potential difficulty, complexity, and risk of an implant-related treatment associated with individual implant dentistry cases in an easy-to-use process. It also helps clinicians with patient selection and treatment planning. The patient was classified as a complex surgical and advanced prosthodontic case (Fig. 4).
Treatment planning
Following a thorough discussion of the various treatment options with the patient, it was decided to proceed with a digital plan that included a guided immediate implant placement in one site and delayed implant placement in the other (Figs. 6-10). The workflow included the following steps:
- Minimally invasive extraction of tooth #21 with alveolar curettage, followed by alveolar socket preservation with Jason® membrane and Cerabone®.
- Minimally invasive extraction of tooth #11, followed by immediate and guided Straumann® Bone Level Tapered (BLT) Implant, Ø 4.1 mm, SLActive® 12 mm, Roxolid®, and gap filling with Cerabone®. Temporary screw-retained splinted crowns delivery on implant #11 in the same visit.
- After tissue healing, a guided Straumann® Bone Level Tapered (BLT) Implant Ø 3.3 mm, SLActive® 12 mm, Roxolid® was inserted at site #21.
- Final screw-retained crown delivery on implants #11 and #21.
- Yearly follow-up visits for clinical and radiographic assessments and reinforcement of oral hygiene instructions.
Surgical procedure
The surgical guide was checked for proper fit before administering local anesthesia with lidocaine 2% with epinephrine 1:100k. Tooth #21 was extracted gently in order to preserve the remaining bone. Moreover, a careful alveolar curettage was done to remove all infected tissues (Figs. 11- 13).
The alveolar socket was preserved with Cerabone® and a Jason® membrane (15x20 mm) and was stabilized with stitches (Figs. 14,15).
Afterward, tooth #11 was also extracted with minimal trauma (Figs 16-17).
Next, the surgical guide was placed. The implant axis and depth were defined, and the drilling protocol was performed following the manufacturer’s instructions. An immediate Straumann® Bone Level Tapered (BLT) Implant, Ø 4.1 mm, SLActive® 12 mm, Roxolid® was placed, considering the high gingival margin of the lateral incisors. Finally, the gap between the implant and buccal bone was filled with a bone substitute, Cerabone® (Figs. 18,19).
After the implantation of #11 and confirmation of optimal primary stability, an immediate screw-retained splinted provisional restoration was placed (Figs. 20-22). The appropriate occlusal load was checked.
The patient came back four weeks after surgery for a follow-up visit. The soft tissue healing was uneventful (Figs. 23,24). Following our treatment plan, a guided Straumann® Bone Level Tapered (BLT) Implant Ø 3.3 mm, SLActive® 12 mm, Roxolid® was inserted at site #21, taking into consideration a minimal distance of 1.5 mm from the implant shoulder to the adjacent tooth at the bone level and a minimal distance of 3 mm between the implants (mesiodistal) (Figs. 25,26).
Following the soft tissue healing, the adaptation of a new temporary restoration was individualized and polished on an implant analog on #11 before being placed and screwed between 15 Ncm and 35 Ncm. The esthetic result was very satisfying for the patient (Figs. 27-30).

Want to stay up to date?
youTooth.com is THE PLACE TO BE IN DENTISTRY – subscribe now and receive our monthly newsletter on top hot topics from the world of modern dentistry.
Prosthetic procedure
Three months later, scan bodies were placed directly on implants, and a digital impression was taken (Figs. 31,32). The color for the final crowns was chosen with the patient (Fig. 33).
Die STL files, color assessment, and lab prescription were sent to the dental technician. The master model was 3D printed, and the crowns were fabricated. Since the substructure and an emergence profile of the crown were optimal and met the patient’s expectations, the final crowns were screwed in, and a radiographic control image was recorded. The periapical x-ray demonstrated an optimal fit (Figs. 34-39). Instructions on oral hygiene were given, and occlusion was checked.
Treatment outcomes
The patient was very concerned for cosmetic reasons about losing both front teeth. He had thought that the treatment was going to be long due to the reconstructions required. For him it was a relief to have a provisional restoration at all times. It has been three years since we treated him with dental implants, and he is very satisfied with the treatment outcome. Self-oral hygiene is not an issue for him, and this new restoration allowed him to smile and talk with confidence again.
Author’s testimonial
In my daily practice, the Straumann® BLT implants enable me to achieve optimal primary stability in fresh extraction sockets and immediate pleasing esthetics due to the possibility of placing a temporary restoration with confidence. As a result, high patient satisfaction is obtained. Furthermore, for patients with limited anatomy, it is the ideal implant to provide a less invasive and time-saving treatment.